An Ad Decision Server (ADS) is a server that offers advertisements that can be tailored to the interests of specific audiences. They’re effective for all kinds of marketing campaigns because they allow you to personalize ads and get the right content in front of viewers who are most likely to convert to paying customers.
When you’re setting up your own ADS server, you may find that you need something simpler to test your configuration with, and that’s where today’s project comes in handy. Using VAST 3.0, you can create a simple XML response that will serve ads in place of your ADS server.
It is useful for testing your setup with broadpeak.io, and it’s easy to create. After you see that testing works, you can create something more robust, that includes more details for what you want to accomplish.
Today, I’ll walk you through the steps that let you make your own VAST 3.0 file and insert an ad at the start of a video clip. This is a simplified example, so it does not allow for tracking, we will explain how to add additional functionality in a future blog post. Ready? Let’s get started!
What You’ll Be Doing:
To complete this project, you’ll:
- Meet the prerequisite requirements
- Set up a bucket on AWS
- Set up a source with broadpeak.io
- Set up an ADS server
Prerequisites
Here’s a list of what you’ll need to follow along. We’ll also review how to get access to each of these. Please note that instructions are geared towards Mac users, you will have to tweak information as needed for use with a PC.
- broadpeak.io account
- Text editor to create your document with
- AWS account (free tier is fine for this project)
- VAST 3.0 file sample (XML included for you)
broadpeak.io Account
You can sign up for a broadpeak.io account here: https://www.broadpeak.io/, just click the GET STARTED button.
Text Editor
This can be any text editor you prefer. When you save your file, save it as XML. Many tools, like Visual Studio Code will let you create any kind of text file you need and help with highlighting opening and closing tags. If you want an editor that’s specifically for XML, there are various free options available online if you search.
AWS Account
You’ll need an AWS account for this project. You can sign up for one at https://aws.amazon.com/. Click Create an AWS Account and then follow the instructions to sign up and get access to Amazon’s Free Tier products.
NOTE: You don’t have to use AWS for your sample, it is just what is selected for the walkthrough. You can host anywhere you like.
Walkthrough
Now that you have the prerequisites squared away, it’s time to get started building your system! First, you’ll set up your VAST 3.0 file and AWS bucket. Then you’ll set up your asset catalog and ADS server with broadpeak.io, and finally, test it out.
Create VAST 3.0 File
Create a VAST 3.0 File containing the ads you want to serve. For your project, use this simple file. This file indicates the ad options, the duration of the ad (Duration tag), and when the ad can be skipped past (Linear skip offset tag). The Impression tag is left in to show where you would add a beacon to measure viewer behavior. It’s not implemented for this walkthrough so it’s empty.
<?xml version="1.0"?>
<VAST version="3.0">
 <Ad id="countdown-1" sequence="1">
  <InLine>
   <AdSystem>GDFP</AdSystem>
   <AdTitle>COUNTDOWN30</AdTitle>
   <Impression />
   <Creatives>
	<Creative id="broadpeakio" sequence="1">
	 <Linear skipoffset="00:00:05">
	  <Duration>00:30:00</Duration>
	   <MediaFiles>
		<MediaFile id="GDFP" delivery="progressive" type="video/mp4"
                 scalable="true" maintainAspectRatio="true" height="480" width="240">
		 <![CDATA[https://bpkcscreatives.s3.eu-west-1.amazonaws.com/commercial-slate.png_30s.mp4]]>
	        </MediaFile>
		<MediaFile id="GDFP" delivery="streaming" width="426" height="236"
		 type="application/x-mpegURL" minBitrate="45" maxBitrate="3240"
		 scalable="true" maintainAspectRatio="true">
                 <![CDATA[https://origin.broadpeak.io/bpk-vod/voddemo/hlsv4/bpkiocreatives/30s/index.m3u8]]>
	        </MediaFile>
		<MediaFile id="GDFP" delivery="streaming" width="426" height="236"
		 type="application/dash+xml" minBitrate="45" maxBitrate="3240"
		 scalable="true" maintainAspectRatio="true">
                 <![CDATA[https://origin.broadpeak.io/bpk-vod/voddemo/default/bpkiocreatives/30s/index.mpd]]>
		</MediaFile>
	   </MediaFiles>
	</Linear>
     </Creative>
   </Creatives>
  </InLine>
 </Ad>
</VAST>
You can test your file to make sure it’s valid by using Google’s IMA HTML5 Video Suite Inspector – https://googleads.github.io/googleads-ima-html5/vsi/. Paste your code into the box, choose VAST XML and click Test Ad. You’ll be able to see the ad run there.
Create a Bucket on AWS
The first thing to do is create a bucket. The bucket will contain your VAST 3.0 XML.
- Navigate to the sign-in page after you get your account.
- Choose the Root user option and enter your Root user email address and password.
- From the Console Home screen, look for the S3 service. Navigate to s3.console.aws.amazon.com.
- From the Amazon S3 screen, you’ll be able to see any projects you’ve set up. For our project today, we’re going to want to make a bucket. Click Create bucket.
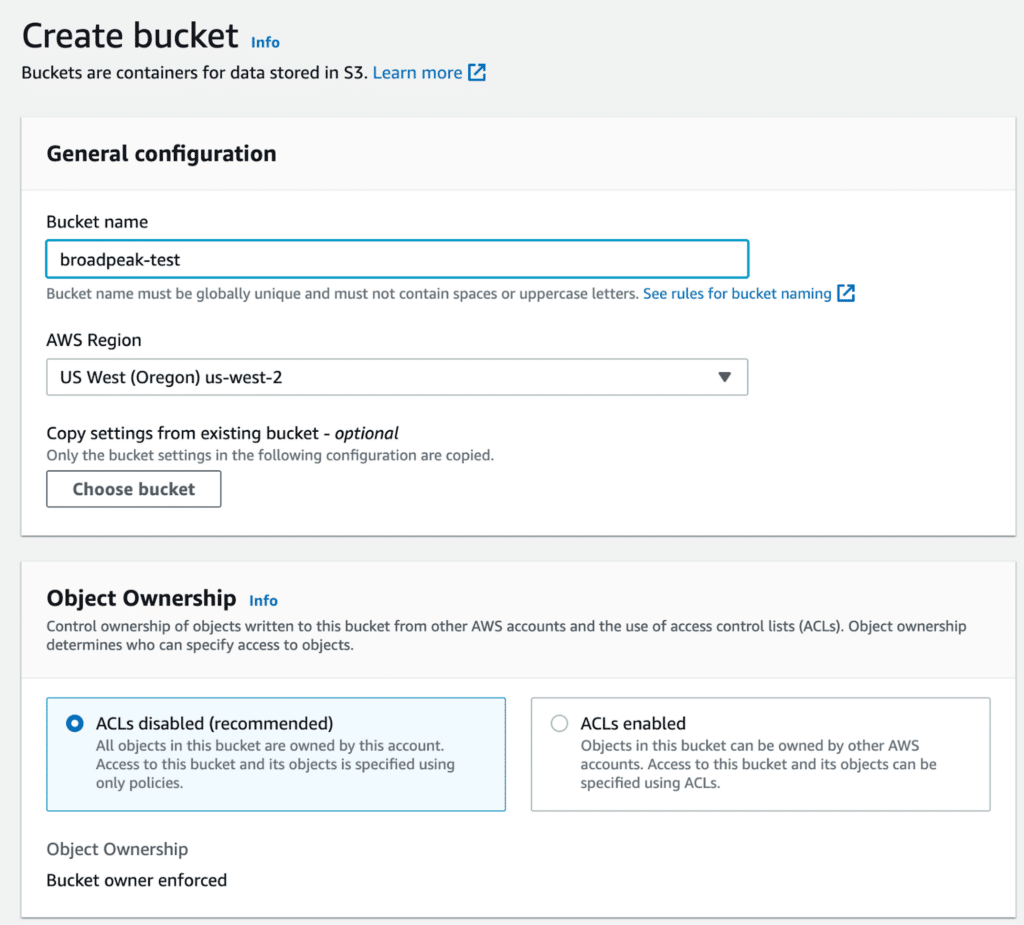
- Choose a unique bucket name, and leave the other settings as they are for now.
- Scroll down past all the options for your bucket and leave the default settings. Click Create bucket.
- From the Buckets screen, choose your new bucket and open it.
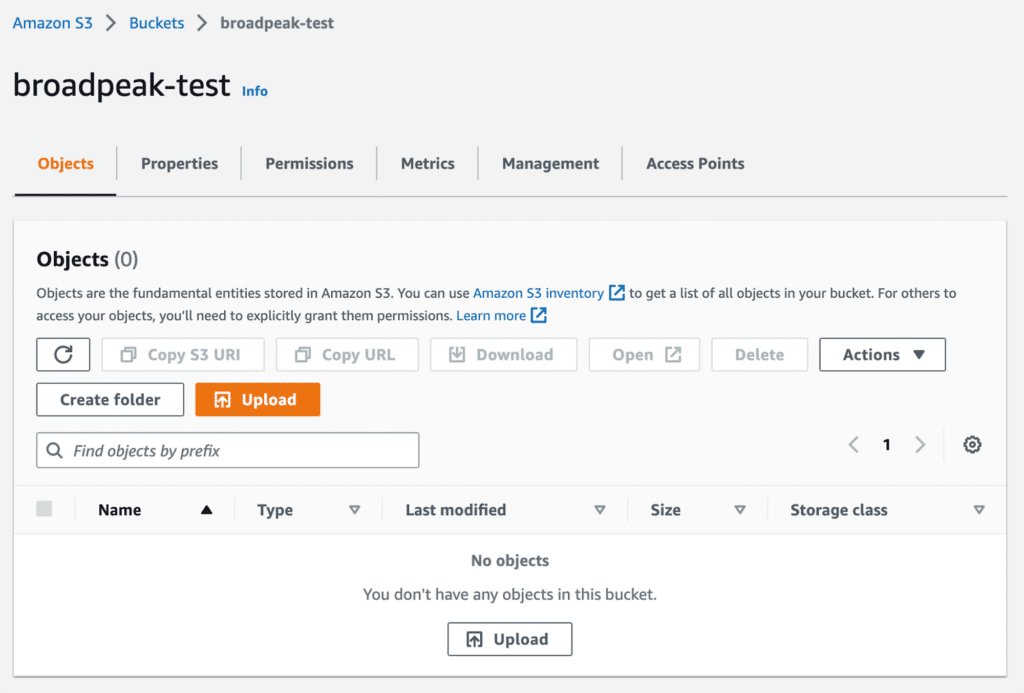
- Click Upload to upload your VAST XML file. You’ll be able to drag and drop your file into the bucket, or you can browse for it and select it.
- In the Block Public Access settings for this bucket section, uncheck the box by Block all public access.
- Scroll to the bottom of the screen after adding it, and click Upload.
Make Your File Publicly Readable
Now we need to configure the bucket policy so that the file will be publicly readable.
- From your bucket, click the Permissions tab.
- Go to the Bucket policy section and click Edit.
- Add this JSON to the Policy area:
{
  "Version": "2012-10-17",
  "Statement": [
    {
      "Principal": "*",
      "Effect": "Allow",
      "Action": [
        "s3:GetObject"
      ],
      "Resource": [
        "arn:aws:s3:::broadpeak-test/*"
      ]
    }
  ]
}
- Click Save changes. AWS will transform your JSON into something that looks like this:
{
  "Version": "2012-10-17",
  "Statement": [
    {
      "Effect": "Allow",
      "Principal": "*",
      "Action": "s3:GetObject",
      "Resource": "arn:aws:s3:::broadpeak-test/*"
    }
  ]
}
You will be able to see that your file is publicly accessible by clicking on your file in the bucket. Paste the Object URL into your browser. If the file is publicly accessible, you will see the XML in the file. Otherwise, it will say access denied.
NOTE: Save the link to your XML file (Object URL when you click on the file for more info), you will need it to set up your ADS Server with broadpeak.io.
Configure Your Asset Catalog in broadpeak.io
Navigate to your broadpeak.io dashboard – https://broadpeak.io – and sign in. The first thing you’ll do is configure your source for the project. In this case, because you’re making an ADS server, you’re going to need an Asset Catalog. It’s a folder that contains all of the videos you want to insert ads into.
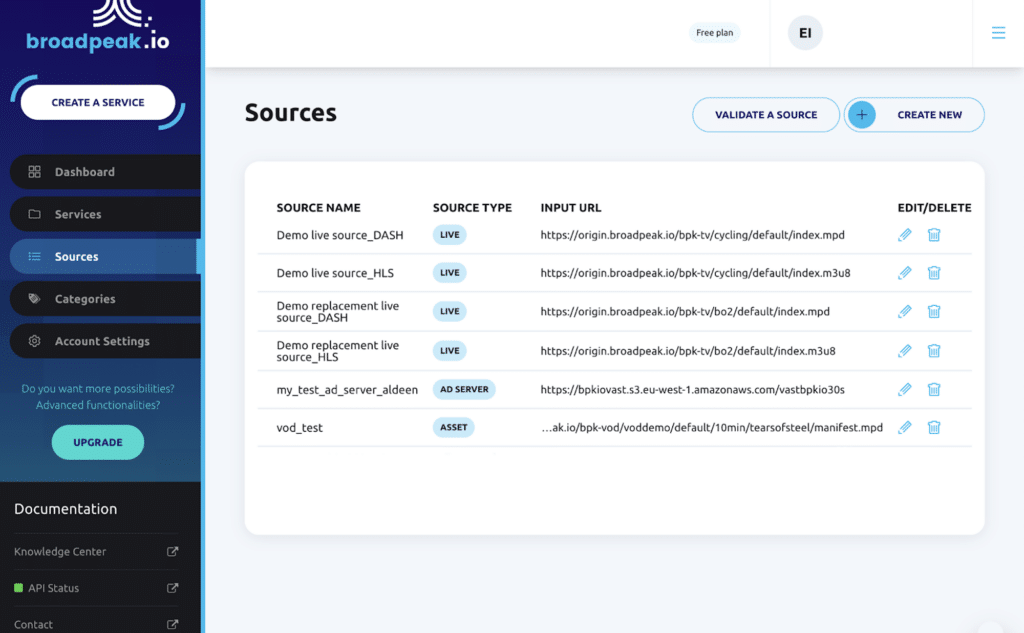
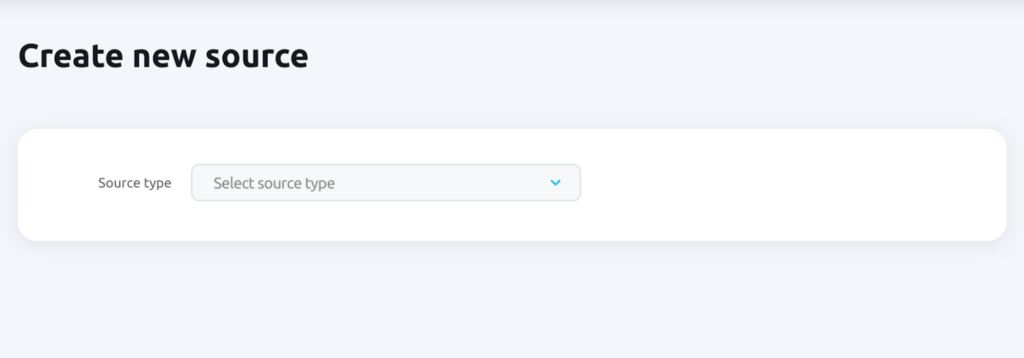
- From your broadpeak.io dashboard, click Sources. The Sources screen opens, showing you any sources you created for your projects.
- From the upper right corner of the screen, click CREATE NEW. The Create new source wizard opens.
- From the Source type drop-down, choose Asset Catalog.
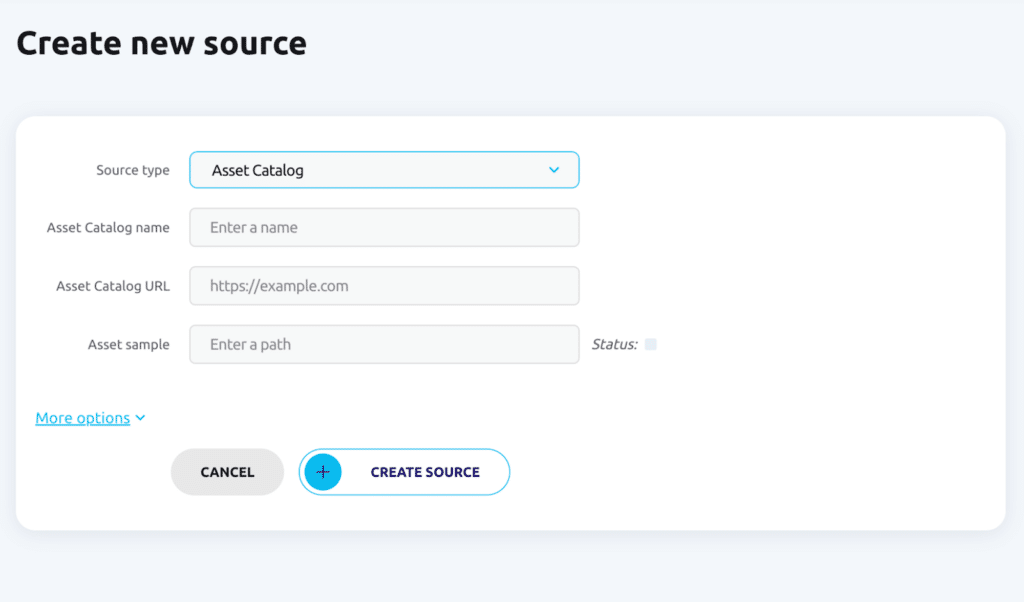
- In the Asset Catalog name field, enter a name for your source. For example, VAST3_DEMO.
- For the Asset Catalog URL, you’ll use broadpeak.io’s demo catalog. The URL to enter is: https://origin.broadpeak.io/bpk-vod/voddemo/default. There’s also the More Options section. You won’t use it for this project, but it allows you to enter the address of a backup server if your primary server is unreachable.
- For the Asset sample field, enter 10min/tearsofsteel/manifest.mpd. If your sample is working, you’ll see the Status icon change from red to green. NOTE: The fields are all sensitive, make sure you don’t have any spaces at the start of your URL. You also may not have more than one Asset Catalog with the same URL and sample in it.
- Click CREATE SOURCE. Your new source appears in the table of available Sources.
Configure Your ADS Server on broadpeak.io
Now it’s time to set up your ADS server.
- Go to the Sources section of your broadpeak.io dashboard.
- Click CREATE NEW.
- On the Create new source screen, choose Ad Server from the drop-down.
- In the Ad Server name field, enter a name for your server.
- In the Ad Server URL field, put the Object URL for the XML file you uploaded to your S3 bucket.
- Click CREATE SOURCE.
You should now have a demo server.
Set up Your Ad Insertion Service on broadpeak.io
The next step is to set up your ad insertion service.
- Click Services.
- Click CREATE NEW.
- On the Create a service screen, for Service type choose Ad Insertion (Live, AVOD, Linear Parity).
- In the Service name field, give your service a name.
- From the Environment tags, choose Lab. (Optional)
- For Choose content, choose the asset catalog you created.
- Click Next.
- For Select an ad server, choose the ADS server you made.
- Click Next. You’ll get a page summarizing the choices you made for your service.
- Click Run. If all goes well, you’ll get a screen saying Well Done!
- Click GO TO SERVICE LIST.
- Choose your service and click the eyeball icon next to it. You’ll be taken to a preview screen that shows you the original content without an ad, and then the content with an ad slate included at the start (the ad will appear after two or more streaming requests, letting the system transcode the asset the right way).
Before we close out, remember to set your bucket back to not being public. You can do that by going to your bucket in S3, clicking the Permissions tab, and checking the box for Block public access (bucket settings) again. Then save your changes.
Conclusion
This walkthrough shows you the basics for setting up a VAST 3.0 File to test the features of broadpeak.io and the features of the system you want to create. Use it as a foundation for more complex projects, like adding beacons and tailored ad choices.
Happy creation!
Banner picture from Sora Shimazaki